From detoxifying to age-reversing and core-strengthening to improved well-being, the benefits of a regular headstand practice are plentiful—and let’s face it, we all want to be able to bust one out in the middle of a party someday, right? Going upside-down flushes increased blood flow, nutrients and oxygen to the face and scalp helping you look better, and also feel better as the adrenal glands are detoxified–decreasing depression. Not to mention the intense core work around the entire mid-section required to hold a headstand.
In Jock Yoga we focus primarily on the ‘tripod’ version of a headstand—to help you ‘get used’ to being upside-down. We also suggest beginning against a wall for support and to remove any unnecessary fear.
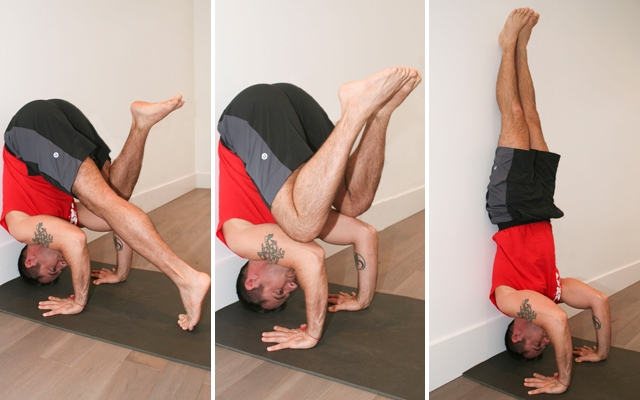
The following steps breakdown a tripod headstand from the beginner variation to the full expression of the pose:
Headstand

Step 1: Bringing your mat toward a wall, interlace your fingers with the knuckles pressing up against the wall. Make sure your elbows are on the mat directly below the heads of your shoulders.

Step 2: Replace your elbows with your palms on the mat—fingers spread a little and facing toward the wall (this means that your hands are now about a forearm’s length away from the wall).

Step 3: Keeping your hands where they are, bring your head down on the mat right in front of the wall—making sure to not come quite to the top of your head just yet (just a bit past the hairline should be good).

Step 4: Curl your toes under, and walk your feet a bit forward toward the wall. This brings you onto the top of your head, while bringing your back closer to the wall, and stacks your hips above your shoulders. You may want to just stay here if going all the way upside-down is not yet your thing! Be sure to press the hands firmly into the mat while keeping the elbows directly above the wrist—the weight should NOT be entirely resting on the head—that’s what the hands are for, and that’s why it’s called ‘tripod’.

Step 5: Once you are used to this semi-inverted position, you may want to play around with bringing one or both knees onto the elbows, coming into a half-headstand or what we called as children ‘teddy-bear stand’. Again, it is imperative to press firmly into the hands to prevent instability in the pose and strain on the neck.

Step 6: If you have placed both knees on your elbows and are ready to take it further, begin to straighten your legs toward the ceiling (remember that the wall is right behind you for support). Once fully upside-down you may have your legs resting against the wall, and that’s okay. You might want to play around with moving one or both legs away from the wall eventually to practice the full expression of the pose. Again—always press into the hands—even more than the head—for stability and safety, and keep the elbows directly above the wrists.
* When you have finished the pose for as long and as far as you want to take it, you can come slowly down the way you came up—hinging at the hips while keeping weight in the hands. After headstand, to let the shoulders and the neck relax, it is often best to rest in a variation of child’s pose with your shins and forehead on the mat, your bum sinking toward your heels and your arms lengthened back along your sides.
—
Check back every other week for a new www.jockyoga.com tutorial by fitness expert Michael DeCorte.

