Do you keep staring at that giant white wall above your sofa and wonder how you are going to fill it? Or worse, you went to IIKEA and purchased one of their oversized prints to fill the space, and it still seems wrong. The easy solution is building your own gallery wall. It may seem like a daunting task, but it doesn’t take that much to create a gallery wall your friends will envy. All you need is a little planning and creativity.
1. Pick the Perfect Place
You’re about to spend a lot of time and money into creating this gallery wall, so make sure it’s in the right spot. The most obvious choice is the prominent wall in the room; long hallways are also great. If you have an empty blank wall, consider hanging the frames so they go from floor to ceiling. This creates huge impact. Another great trick is to create the gallery wall around your flat screen TV, just make sure you treat the television as another black frame in your composition.
2. How to Properly Hang a Frame
Ensure you have proper tools: a hammer, tape measure, level, pencil, and picture hanging hardware. This is a good time to invest in tools if you don’t have these basics.
Once you have figured exactly where you want the frame to hang, use the level to ensure it is level and faintly mark the two top corners of the frame. Now, using a tape measure, mark the center point between those two points. Now measure down the length from the top of the frame to the wire (when the wire is fully taut). This is where you’ll place your nail. It is always a good idea to use picture hanging hardware; it will be more secure for heavy frames. Small shelf adhesive velcro strips are great to add to the bottom corners to keep the frame from going off kilter.
* Now you have to pick if you want a traditional grid gallery or something more ogranic and collected.
Option 1: The Grid Gallery
If you prefer modern and minimal, keep things simple with a tight grid arrangement. To maintain the minimal aesthetic, use identical frames for the entire display. Ensure you arrange them in evenly spaced rows and columns. Just remember, just like hanging single pieces of art, you always want make sure the focal point is at eye level (the standard gallery height is about sixty inches off the ground). To maintain a minimalist aesthetic, choose pieces that belong to a series, or from a single color story. But be warned, perfect grids can be a tough to hang exactly.
Option 2: The Collected Gallery
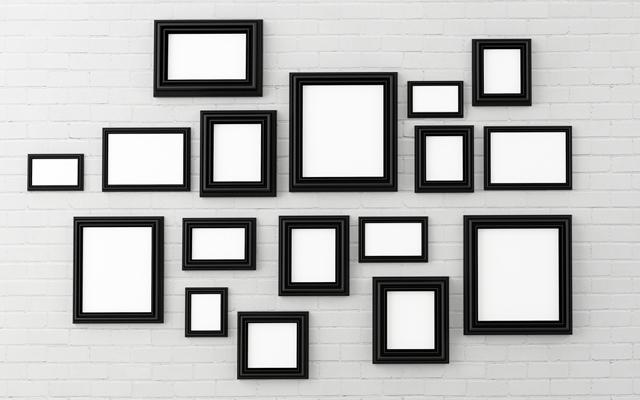
Recently, gallery walls have become more ecletic; they look like a collection you have amassed over time. For the collected gallery, there are no rules. You can mix prints and objects on the wall; you can even mix finishes on frames. If you can stick it to the wall it just might work. The key to achieving this collected gallery look successfully is the composition. Here’s a tip: lay out your arrangement on the floor, or you can trace the shapes of the frames/objects onto paper and then tape them to the wall. This will save you from mistakes and patching holes in your wall. Just remember to always start with your largest pieces in the center and work your way outward. The advatange to this gallery is style is that you can easily add to it; consider it an ever evolving gallery.
Option 3: A combination of the two.
You can make the minimalist aesthetic of the grid gallery more interesting by hanging it in a non grid formation and mixing in objects like in a collected gallery. Just ensure you keep all the frames the same and the prints similar in tones.


